Painting Minis: The Golden Fleece
Today, I bring you... THE GOLDEN FLEECE!!
The first miniature I ever painted!
Here's a quick backstory:
I've always had a thing for drawing but I'm a disaster with colors! That's why I don't trust myself with painting. However, a colleague has requested me to paint his miniatures. I declined at first because I fear that I might ruin his minis with my painting skills (lol). But since colleague said it's okay even if I don't perfect it then might as well try it! It's an opportunity to learn. Plus, he'll be providing the paint, brushes and all!
Here's the guinea pig subject:
 |
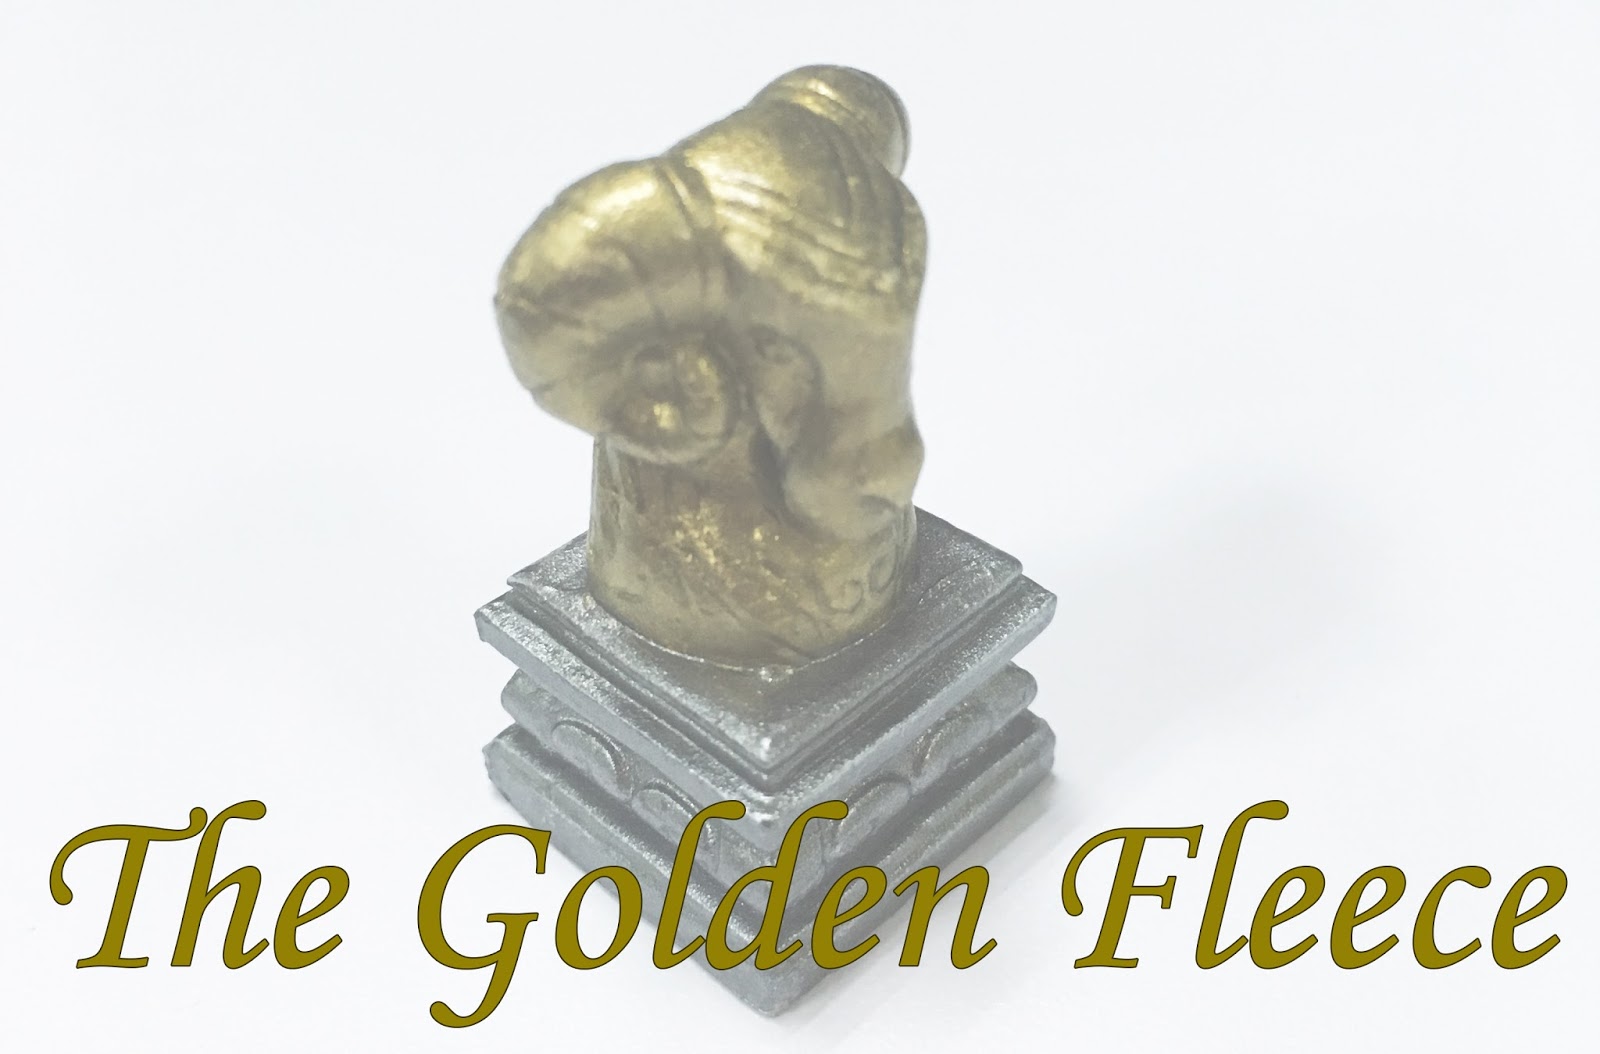
| This is the finished mini. I forgot to take a photo of the original one so here's a link instead. |
This is from Santorini's expansion pack.
And without further ado, below are the steps I took in painting the Golden Fleece.
Google. Watch tutorials.
Seriously, I totally have no experience in painting models (except the buy 1 take 1 figurines you can paint at SM which I doubt is nowhere near minis) and I'm not going to pretend I know about paints, too. If I did not take time to search, I won't even know what the primer is for.
Prepare materials.
I got all the needed materials ready to make sure my work will be uninterrupted. I don't want to stop midway because I lack the necessary stuffs I need. So here's what I prepared:
- the mini, of course
- paintbrushes
- paint
- primer
- water (just in case)
I also double checked if I have all the colors that I would need. I originally wanted to use rainbow colors but that wouldn't make any sense for a Golden Fleece.
This also includes preparing your workstation. And if you're a parent like me who has kid(s), make sure you do your work away from them, or maybe when they're asleep.
I started painting the mini while my little Akisa was playing. When she saw what I was doing, she was curious and transferred all of her toys near my workstation.
Paint the Golden Fleece.
First off, I applied the primer. This would allow the paint to stick on the subject.

If you saw the original piece, it was all yellow. After applying the primer, the Golden Fleece turned gray.

I added the base coat for the sheep. I mixed bronze and gold.
See all the parts where the gold shouldn't be? That's one reason why I told you to keep your kids away from your workstation. :D
When the paint was dry, I added the base coat for the pillar.
Though, I could've finished the sheep first before proceeding to the bottom part but whatever.

I left the paint to dry and actually did some chores like sorting out the newly washed clothes and actually be productive (woohoo!).
I added a second coating for the sheep and the pillar.
When it was dry, I tried to add some panel lines. I haven't done it before and I don't know what brush to use, plus my hands were a bit shaky so it wasn't really perfect.
 I let it dry and applied a thin coat (same color with the base) to the sheep.
I left it to dry and actually did some shopping (haha).
Came home and added some highlights by dry brushing it (cause this is maybe the easiest way to add highlights XD).
Mr. Kulot then added some topcoat (yeah, he got these kinds of stuffs too because of Gunpla).
And voila!
Here's the result:

Not sure if the highlights are visible on cam (I can't seem to change the focus of the camera on the sheep huhu) but it's there. I promise. (charot)
I wanted to do washing for some shadow effect but I have no wash paint. Haha.
Overall, I was happy with the result.
I mean, for my first mini, it's not so bad after all.
I will be doing the rest of the pieces from the same expansion pack sometime this week.. or weekend.. or later this month.
If you have any techniques for painting models or miniatures, feel free to share! Teach me, sensei!
I would really love to hear from you!
I added a second coating for the sheep and the pillar.
When it was dry, I tried to add some panel lines. I haven't done it before and I don't know what brush to use, plus my hands were a bit shaky so it wasn't really perfect.

I left it to dry and actually did some shopping (haha).
Came home and added some highlights by dry brushing it (cause this is maybe the easiest way to add highlights XD).
Mr. Kulot then added some topcoat (yeah, he got these kinds of stuffs too because of Gunpla).
And voila!
Here's the result:

Not sure if the highlights are visible on cam (I can't seem to change the focus of the camera on the sheep huhu) but it's there. I promise. (charot)
I wanted to do washing for some shadow effect but I have no wash paint. Haha.
Overall, I was happy with the result.
I mean, for my first mini, it's not so bad after all.
I will be doing the rest of the pieces from the same expansion pack sometime this week.. or weekend.. or later this month.
If you have any techniques for painting models or miniatures, feel free to share! Teach me, sensei!
I would really love to hear from you!


4 comments
char ka lang, pwde na maging painter :)
ReplyDeletepintor ahhaha
DeleteThis comment has been removed by the author.
ReplyDeleteWhy is the comment deleted? hahaha
Delete